
Handling Short Expiration Time of Authorization Tokens
- Odysseus
- Offensive security
- December 22, 2020
How not to waste precious time when testing a web applications or API’s with Burp Suite
Introduction
In my few years doing web/API pentesting, it was the first time I had to think about how to automate the process of renewing an authorization token during the process of bruteforcing with Burp’s Intruder and when using Burp’s Repeater so I din’t have to do it manually every ten minutes, which was the expire time for the token in this scenario.
Well, since I haven’t seen any blog posts on this specific scenario, I’ve decided to write one myself. Perhaps it can help folks out there struggling just like I was recently.
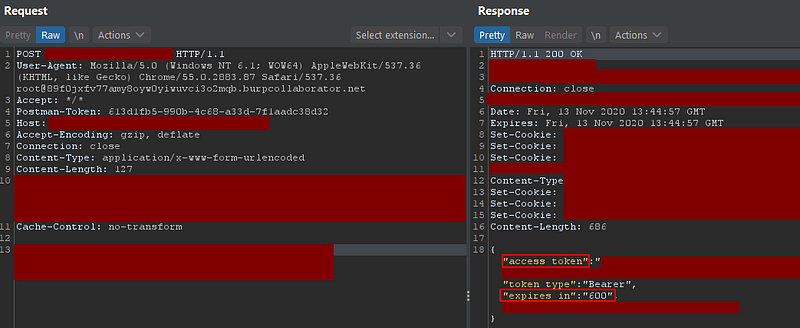
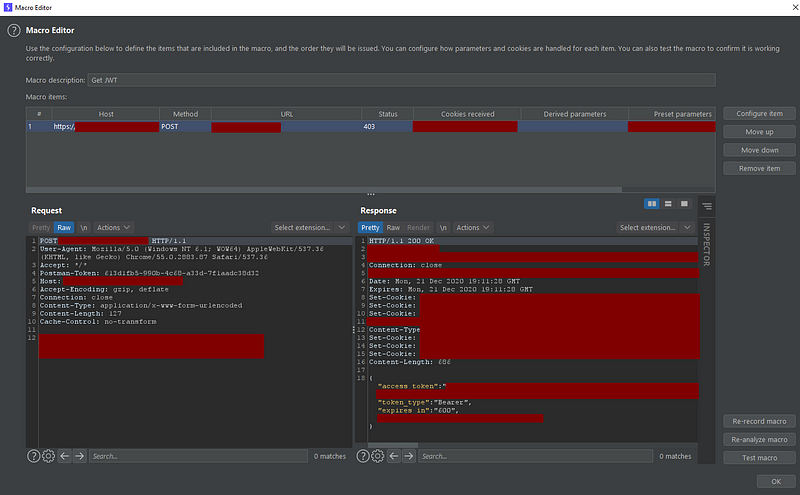
I was actually doing a pentest on an API and it had two main endpoints: one for getting a new authorization token and the other to request some data using this token. Below you can see both requests to these endpoints:
The Problem
As you can see in the first image above, we have a very small window for interacting with the API before we need another token because of the property “expires_in” in the response body. As a matter of fact, when I tried to run Intruder for longer than ten minutes, I started to get status code 401 (unauthorized). Unfortunately when I was testing the API I didn’t have any intention of writing a blog post about this, so once I figured it out, I simply ran the attack again and all of the requests resulting in 401’s were reissued. No prints here, sorry…
The First Part of the Solution
Moving on, once I realized that I had to deal with this short time frame before having to request a new token, I began to do what every good penetration tester does: begging on my knees for google to bring me a solution

Jokes apart, I knew that Burp had something for handling sessions, but I had never used it before, nor I knew where those options were. Even so, It wasn’t dificult to find them:
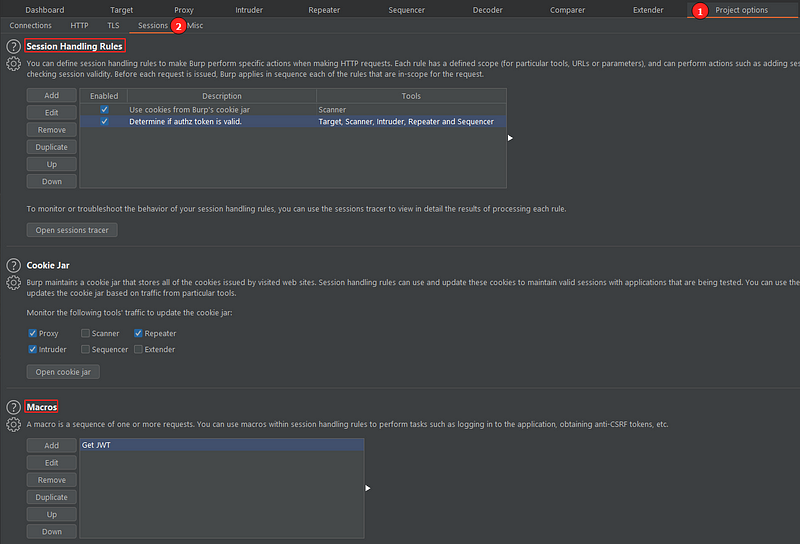
As we can see, the descriptions are self explanatory: session handling rules define , well, rules. They’re applied every time a request within the scope for that rule is being issued. Let’s detail this area a bit more:
Session Handling Rules
This session lets you create rules with predefined scope and they will be executed before every request that is in the same scope. It can be used to check the validity of a session, add cookies to the request, perform login. It’s important to note that all the rules are applied in the same order they are listed, respecting their scopes, that is, if a rule isn’t in the scope of a certain request, it will not be applied to that specific request.
Macros
Quoting the very well put description:
A macro is a sequence of one or more (HTTP) requests. You can use macros within session handling rules to perform tasks such as logging in to the application, obtaining anti-CSRF tokens, etc.
Building the session handling rule
Knowing how these two resources work, we can now start building a session rule and a macro to renew our access token. First let’s add a new rule:
In the image above we can se an area for a brief description and also what actions it will perform once it’s called. Thare’s also the scope tab, as seen below:
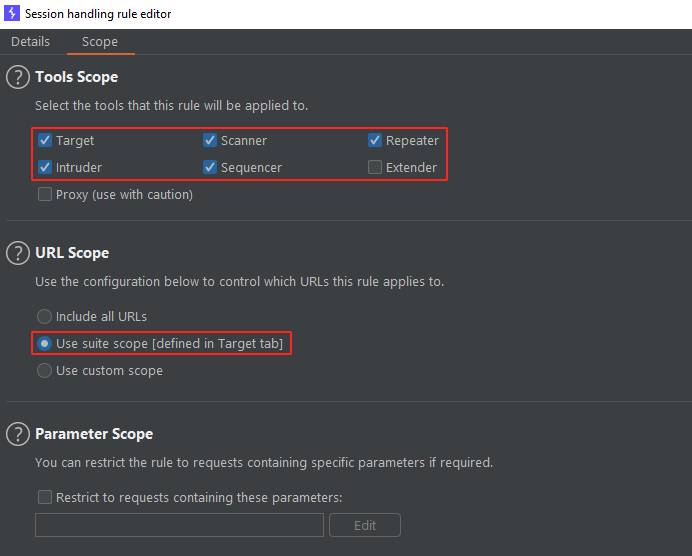
This tab let’s you choose in what parts of Burp Suite this rule will be used, to what URL’s they can be applied, as well as restricting the rule only to requests containing custom parameters.
Adding a Rule Action
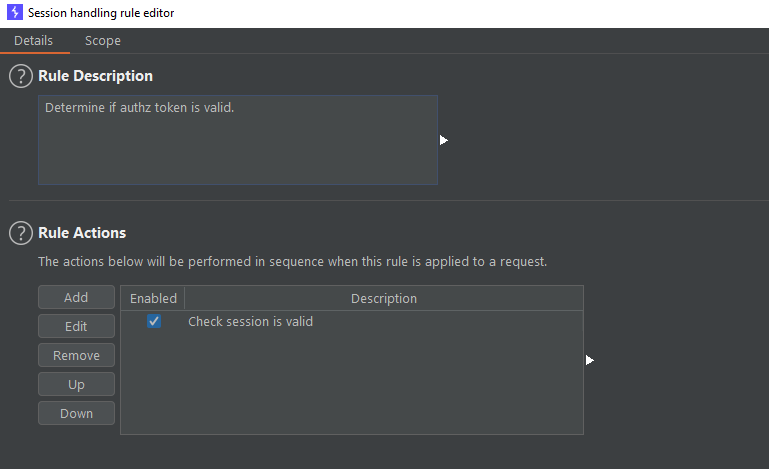
Once we defined the rule scope, let’s add an action to be performed when this rule is executed. We named the action “Check session is valid” and here is where things start to get real:
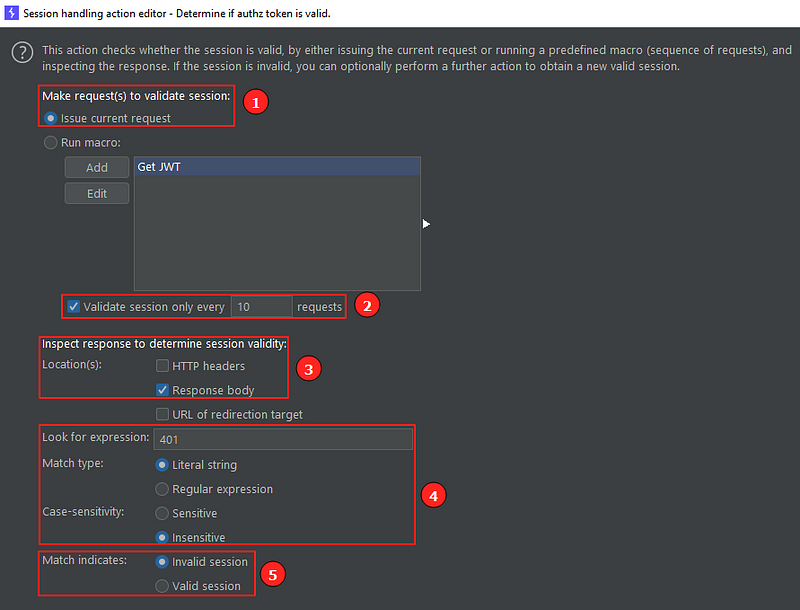
Let’s break the action editor in two parts:
Rule action editor: first part
- First the action needs to make an HTTP request as the first step to validate the session. Here I said that I want to issue the same request that is being validated, but I could also run a macro (let’s see macros in a bit) to do the same thing if it was the case.
- How often in terms of requests Burp will perform the session validation. In the image, we can see every 10 requests, which for this scenario is unecessary, but let’s keep this way anyway.
- Where to inspect the response to check if the session is valid. Here we can see “HTTP headers”, “Response body” (our case) and “URL of redirection target”.
- What to look when inspecting the response. In my case I had to look for the literal string “401” in the response body as this was the bahaviour i got when the token expired. Note that we can also look for regex and make the search case (in)sensitive.
- Lastly, for this first part, we have to indicate if a match means that the session is still valid or if it’s invalid. In my case, the literal string “401” means that the session is invalid.
Rule action editor: second part
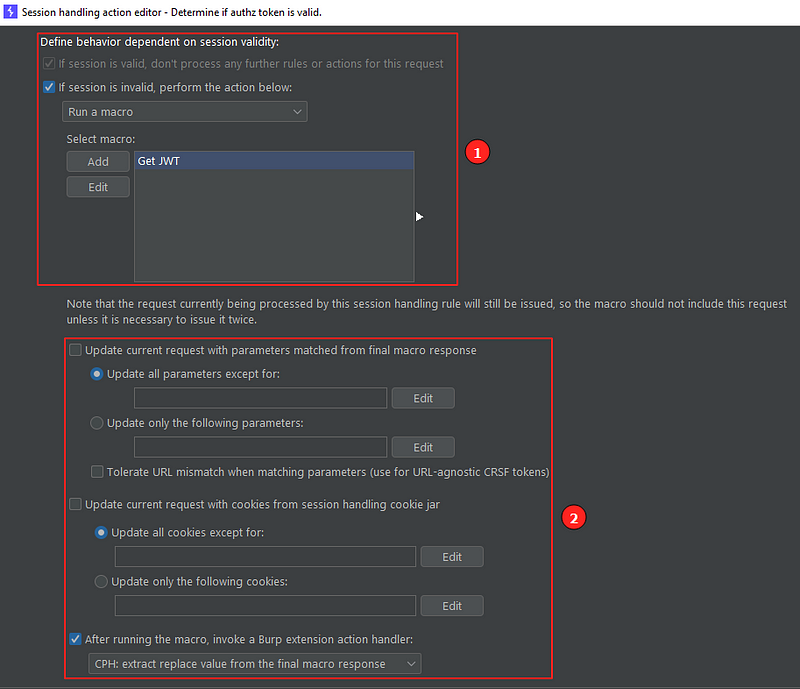
This second part is broken down in two:
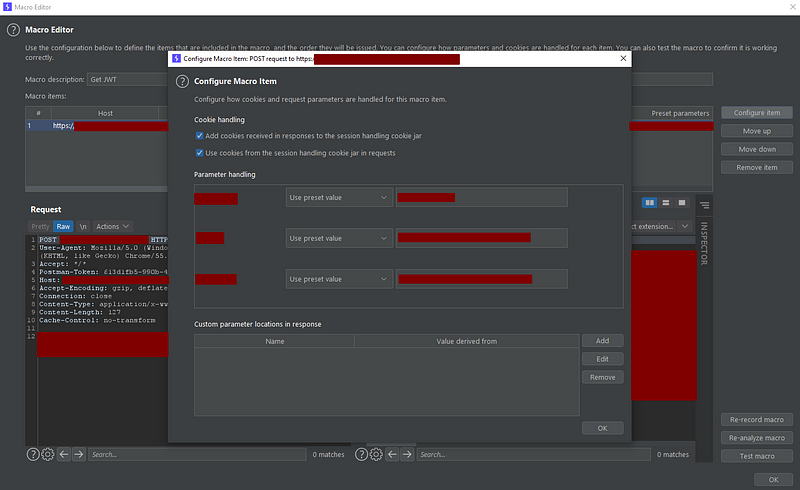
- What happens if the session is valid/invalid: If it is valid, no other rules or actions are processed for this request. If it is invalid, I chose to run a macro, which we’ll see next.
- For the last part, we can update the request with parameters matched from the final macro response and/or update the request with cookies from session handling cookie jar.
The Second Part of the Solution
Now, note the last checkbox in the image above. I can, after running the macro, invoke a Burp Extension action handler. What id does is pass the macro’s requests to the extension and it will do something with them.
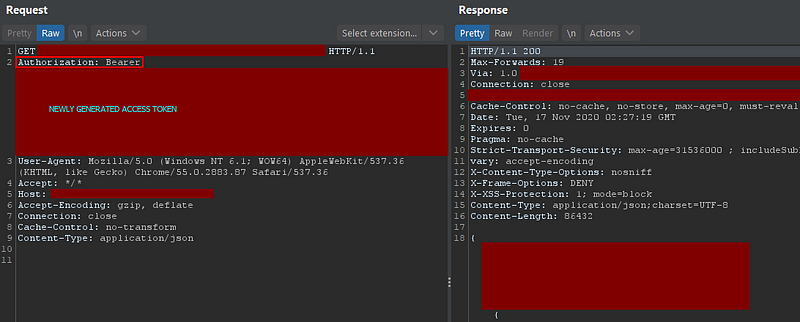
Now, can you tell me why I need an extension to be called in the first place if I have a whole system for handling sessions? Well, if you look closely, none of the requests actually have sessions because they don’t use session cookies to handle authorization. All we have is the header Authorization: Bearer with a big base64 after it, which is the actual token.
So, after all this trip we can see that Burp does not have (at least not yet) a built-in process for handling this type of need: I need the contents of a header from the request to be replaced with part of the contents of the macro’s response. Good thing that Burp has this amazing capability of integrating extensions to fill in those gaps.
So for this specific need, there’s this Burp extension called “Custom Parameter Handler ” or CPH. What it does is “modifying HTTP messages with surgical precision, even when using macros”. More precisely for my scenario, it allows, among other things, search and replace inside requests and responses .
But before we dive into the configurations of the extension, we have to see what the heck this macro thing does, because we’re going to need this knowledge soon.
Configuring a macro
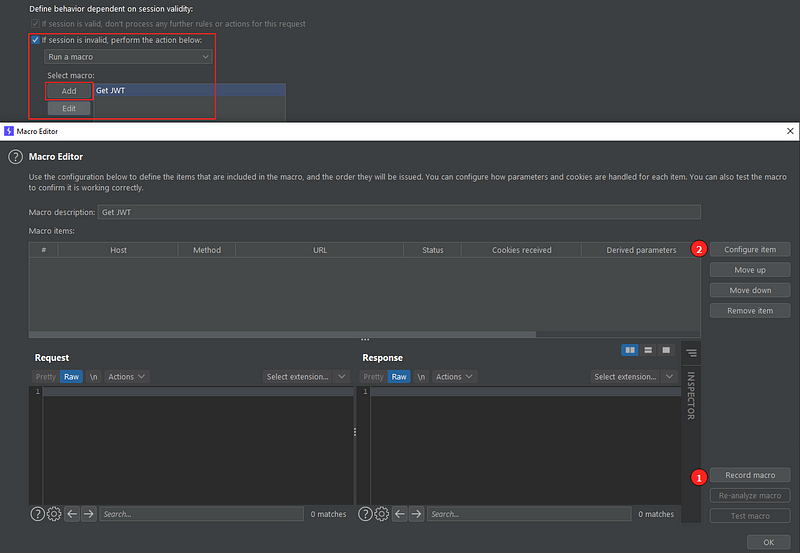
In the image above we can see the main window for recording and configuring a macro. As I said earlier, a macro is a group of requests that are issued in order. Also, we can pass parts of the response from a request to the next one until we have one final HTTP response. In my case, all of the requests listed here will be passed to the CPH extension.
First we have to record the macro, that is, select from the proxy HTTP history tab all the requests we want to be part of the macro. In my case, it’s only the one that generates a new access token:
We could, if we wanted, configure each macro request to get all the needed parameters from the responses and pass them to the next request:
Although I’m not going too deep in this part, this window lets you add and use cookies from each response to the session handling cookie jar so they can be used in the next request. Also, we can specify parameters with a lot of precision. Burp will get the parameters configured here and pass them to the next request of the macro.
So, now you can see that we don’t have any options for replacing header values from the macro’s response into our actual requests. That’s why we need to use the CPH extension. Let’s finally see the magic:
Configuring CPH extension
Let’s break this explanation into three parts. This first will handle CPH options:
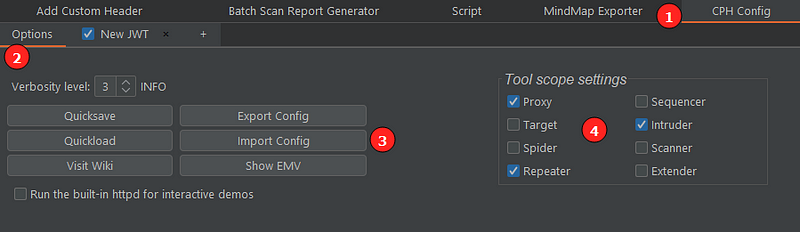
- The CPH tab will appear once you install the extension.
- In it we can see the options tab. There we can save/load or import/export a configuration and we can also set the Burp tools that the extension will work with.
The second part deals with the creation of tabs:
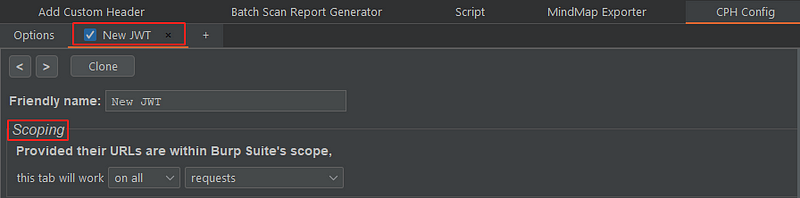
Once you selected “After running the macro, invoke a Burp extension action handler” checkbox in the last part of the Session handling action editor, a CPH tab is automatically created to handle the request of the macro. The first part of the tab let’s me name it and set the scope of use inside the URL’s that are in Burp’s scope.
The third part is the magic:
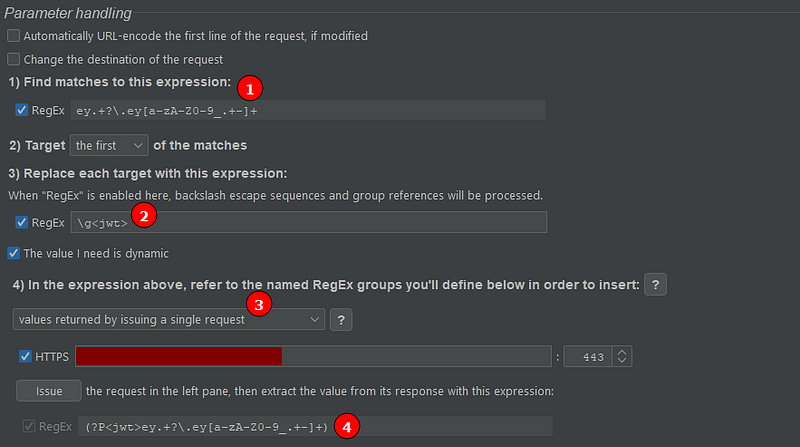
- Here we setup a regex for searching the string to be replaced in the original request. Notice that the regex starts with “ey”. It will match exactly the access token (a JWT ) that expired.
- The first string found by the regex in (1) will be replaced by the contents of a second regex. In this case, “\g” refers to a named regex group called “jwt”, which we’ll see in (4).
- If I check the “The value I need is dynamic” box, option number four becomes available. We want to use it because every time we issue the request, a new token is generated.
- Finally, when the macro request is issued, this regex search is performed to extract the newly received access token. Note that I start the regex with (?P… Here I’m naming the regex group defined by the pair of parenthesis, which in this case match the whole token.
So, the value extracted from the response by the regex (4) search is used to replace the old access token (option 2). This way I can even issue a request to the main endpoint of the API with an invalid JWT and the request will still work because in the background this extension will be working its magic.
Conclusion
The conclusion here is that Burp Suite is way more powerfull than you and I can imagine. And I don’t even use its full power. And just to be clear, this post is not sponsored by PortSwigger in any way. I’m just stating a fact. They are doing a really good job with this tool.